Model 368 Adjustable Automatic Donor Scale
For use with Blood Collection Containers for Weighing Whole Blood During Collection
Inspection and Testing:
The following visual and functional tests must be performed daily prior to use:
-
Visual:
Refer to Figure 1 for visual testing. The scale must be inspected to check if:
a. The fixed weight is compromised (i.e., no shiny adhesive on screw).
b. There is resistance in the motion of the lever arm.
c. The wedge-shaped stud (used for tubing occlusion) is chipped or
smoothed out. If this condition is present, the flow may not
completely stop once the scale tips.
d. The suspension pin is broken.
Note: If any of the conditions listed above are observed, do not use the scale. - Functional:
If the scale is not already installed, perform installation as instructed in the "Installation" section below. The scale must be functionally tested to + 10 grams (using calibrated weights) as follows:
a. Slide the counter weight to the target setting by pushing the safety
button on the bottom of the weight.
b. If for example the target setting is 610 grams, use weight #1 = 600
grams and weight #2 = 620 grams. Hang weight #1 on the
suspension pin. The scale should not tip.
c. Remove weight #1 and then hang weight #2. The scale should tip.
d. If the scale fails this test, check to see if the scale is level. If the scale
is not level, level the scale, repeat steps "a" through "c."
Note: If the scale is level, and it fails the functional test, do not use the scale.
Installation:
- Attach the scale to a laboratory support rod (1.3 cm [1/2"] diameter). Tighten the thumb screw to prevent scale from slipping.
- Check for free movement of the lever arm and ensure that the scale is well anchored to the stand.
-
The scale must be level to function properly. Check level periodically.If
scale is jolted, disturbed or moved to a different location, ensure
that it
is level before using.
Instructions for Use:
- Suspend the blood collection container from the suspension pin.
-
Thread the donor tube through the tubing guide and tubing
slot. Use of the tubing guide is
optional. Make sure no kinks are formed in the tubing.
Note: If the tubing guide is not used, ensure that the donor tubing is routed in such a manner as
to avoid any contact with the fixed and counter weight assembly. -
To collect the desired weight of blood, move the counter weight
to the target setting by pushing
the safety button on the bottom of the weight and sliding it to the target setting. - Prepare the donor's arm in the usual manner and perform phlebotomy.
-
Mix blood and anticoagulant at several intervals during collection and
immediately after
collection. When the blood collection container is almost filled, care should be taken in mixing
to prevent premature tipping of the scale. -
When collection is complete, the weight of the filled blood collection
container depresses the
scale's lever arm causing the wedge-shaped stud to close off the donor tube and stop the flow
of blood.
Maintenance:
- Do not lubricate or perform any repairs on the scale.
- Clean scaleon as-need basis only, using 10% bleach and 90% tap, distilled or deionized water mixture.
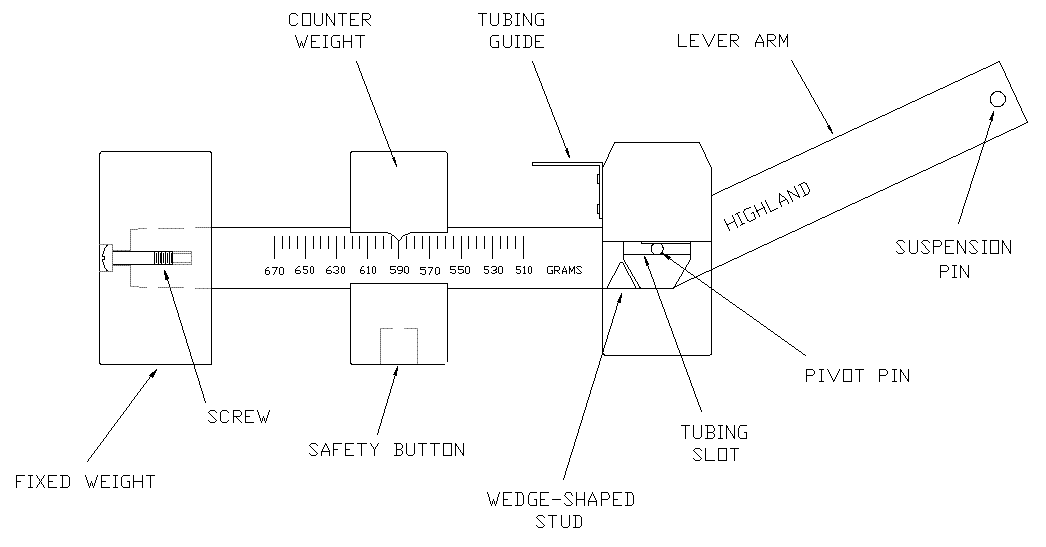
Figure 1
Manufactured By:
Highland
Labs, Inc.
163 Woodland Street
Holliston, MA 01746-2218, U.S.A.
Tel:(508)-429-2918 Fax: (508) 429-6283
Email: info@highlandlabs.com http://www.highlandlabs.com
Rev. E